
Getting started
Caliptus runs entirely on your computer. This section shows how the interface is laid out and how to handle the basics: creating a project, saving your work and getting it back if anything goes wrong.
The workspace
The whole window
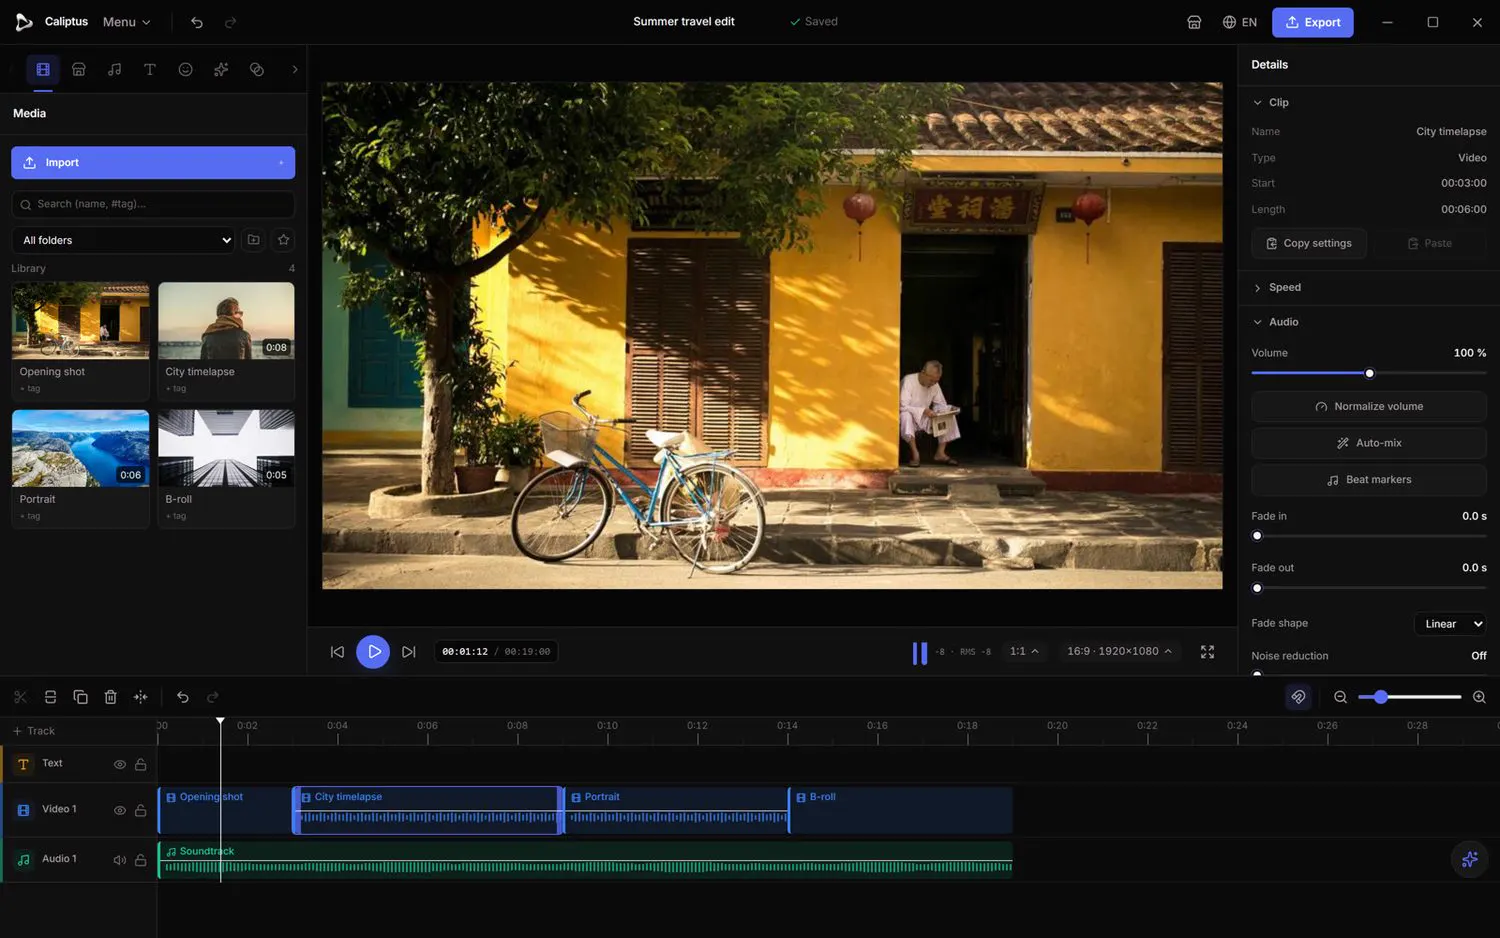
The editor is split into a few fixed zones. Knowing where each one lives makes everything else in this guide easy to follow.
- Top bar: the project menu, the project name and save state, undo/redo, and the Export button.
- Tool rail (just under the top bar): the tabs that switch the left panel: Media, Audio, Text, Effects, Transitions, Captions, Adjust, and more.
- Left panel: the content of the active tab (your media library, the effect list, the color tools, etc.).
- Preview (center): what the playhead sees, with playback controls underneath.
- Inspector (right): every property of the selected clip. It changes depending on what you pick.
- Timeline (bottom): your tracks and clips, the ruler and the playhead.
Too many tabs for your needs? Use the collapse button at the end of the tool rail to switch to Simple mode and hide the advanced tools.
Create, open and save a project
Top bar > Menu
Projects hold your timeline, your settings and links to your media (the media files themselves are never copied into the project).
- Open the Menu at the top left.
- Choose New project to start fresh, or Open to reopen an existing project.
- Use Save (Ctrl+S) regularly, or Save as to keep a separate copy.
- The save state shows next to the project name: Saved, Saving or Unsaved.
The project name and format (resolution and frame rate) are shown in the Inspector when no clip is selected.
Autosave and session recovery
Automatic
Caliptus keeps a background copy of your session so an unexpected shutdown does not cost you your work.
- Keep working normally: the session is saved automatically in the background.
- If the app closed unexpectedly, a Session recovery prompt appears on the next launch.
- Choose Restore to bring back the unsaved session.
Project history (restore points)
Top bar > Menu > Project history
Beyond undo/redo, you can create named restore points and jump back to any of them later.
- Save the project first (history needs a saved project).
- Open Menu > Project history.
- Type a name and click Create to capture the current saved state.
- To roll back, pick a restore point and click Restore.
Automatic restore points are added over time too, so you always have a few fallbacks even if you forget to create one.
Your account and offline export
Export › Start export (first time)
Editing needs no account. A free account is asked for when you export, and the same account works across the app and the website.
- Edit freely without signing in: the editor, the local AI, saving projects and browsing the marketplace all work without an account.
- The first time you export, sign in or create a free account, then confirm the 6-digit code sent to your email.
- Export then keeps working offline for 14 days after your last sign-in; reconnect from time to time to keep exporting. You can switch account or sign out at any point.
Only your sign-in and feature settings travel over the network. Your footage and all processing stay on your machine.
Simple and advanced modes
Tool rail > collapse button
Simple mode trims the interface down to the essentials; advanced mode reveals every tool.
- Click the button at the far end of the tool rail to toggle between the two modes.
- In Simple mode, only the core tabs stay visible.
- Switch back to advanced mode whenever you need the full toolset.